Setting up proper studio lighting for filming
Setting up proper studio lighting for filming involves several considerations to achieve the desired look and feel for your video. Here's a guide on how to set up lighting and an explanation of the 3-point lighting technique, the latest lighting technology, and considerations for videographers when choosing lighting equipment:
Setting Up Proper Studio Lighting,managing the Color temperature and understanding of the brightness required:
1. Key Light: This is the primary light source and is typically the brightest. It's placed to one side of the subject, at around a 45-degree angle, illuminating the main features. It establishes the overall look and feel of the scene.
2. Fill Light: Positioned on the opposite side of the key light, the fill light reduces the shadows created by the key light. It's generally softer and less intense than the key light, providing a balanced illumination without harsh shadows.
3. Backlight (or Rim Light): Placed behind the subject, the backlight separates the subject from the background by creating a rim of light around their edges. This light adds depth and dimension to the shot.
3-Point Lighting:
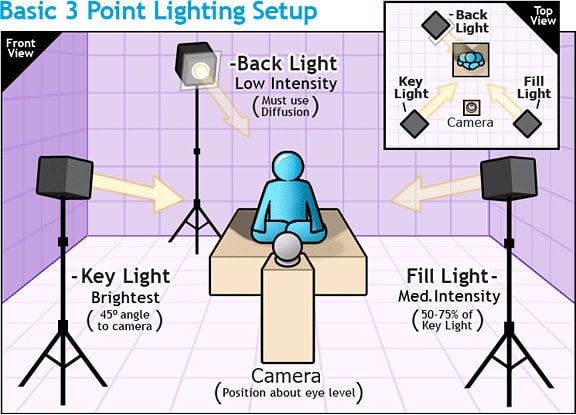
The 3-point lighting technique is a fundamental setup used in filmmaking and photography, employing three primary lights as described above: key, fill, and backlight. It provides depth, dimension, and control over the lighting environment to create visually appealing scenes.
Latest Lighting Technology:
The lighting industry is continuously evolving. As of my last update, LED (Light Emitting Diode) technology has been prevalent in the latest lighting equipment for videographers. LED lights offer advantages like energy efficiency, adjustable color temperature, dimmability, and portability compared to traditional tungsten or fluorescent lights.
Considerations for Videographers:
1. Quality of Light: Look for lights that offer good color accuracy (high CRI), adjustable color temperature, and sufficient brightness for your needs.
2. Portability and Versatility: Consider the portability and versatility of the lighting equipment. LED panels with adjustable settings are often preferred for their ease of use and adaptability to various shooting environments.
3. Budget and Affordability: Determine your budget and find lighting solutions that offer the best value for your specific requirements. There's a wide range of lighting equipment available at different price points.
4. Control and Modifiers: Evaluate the availability of modifiers such as softboxes, diffusers, barn doors, or grids that allow you to shape and control the light to suit your creative vision.
5. Compatibility and Expandability: Ensure the lights you choose are compatible with your current setup and consider options that allow for expansion or modification as your needs evolve.
Factors to Consider When Selecting Color Temperature:
1. Ambiance and Mood: Color temperature influences the mood of your video. Warmer temperatures (lower Kelvin values, around 3200K) create a cozy, intimate feel, while cooler temperatures (higher Kelvin values, around 5600K) provide a more vibrant, daylight-like appearance.
2. Subject and Setting: Consider the environment and the subject you're filming. Certain scenes or subjects might benefit from warmer or cooler lighting to enhance their appearance or convey a particular atmosphere.
3. White Balance: Ensure your camera's white balance settings align with the chosen color temperature of your lighting to maintain accurate colors in your footage.
4. Consistency Across Scenes: If shooting multiple scenes, maintaining consistent color temperature throughout the video helps create a cohesive visual narrative.
Handling Lighting Color Shifts Over Time:
Lighting color shifts can occur due to several reasons, such as aging bulbs, changes in electrical current, or alterations in the components of the lighting fixtures. To address and prevent color shifts:
1. Regular Maintenance: Schedule routine checks and maintenance for your lighting equipment. Replace aging bulbs or components that might contribute to color shifts.
2. Calibration: Periodically calibrate your lighting fixtures to ensure they maintain consistent color temperatures over time. This might involve professional calibration or adjusting settings in LED panels that offer color temperature controls.
3. Quality Assurance: Invest in high-quality lighting equipment known for its stability and consistency in maintaining color temperatures.
4. Environmental Control: Limit exposure to extreme temperatures or humidity, as these factors can impact the performance and color consistency of lighting fixtures.
5. Record and Compare: Keep records or test your lighting periodically to note any shifts in color temperature. Compare against previous footage to detect changes and take corrective measures if necessary.
Remedies and Preventive Measures:
- Color Correction in Post-Production: In case of minor color shifts, use editing software to correct color temperature discrepancies during post-production.
- Managing color shifts in post-production can indeed be time-consuming, especially if there are significant discrepancies in color temperature across various clips or scenes. To further address this
Minimizing Color Shifts in Post-Production:
1. Consistent Lighting Setup: Aim for consistency in your lighting setup during filming. Maintaining uniform lighting conditions can reduce the likelihood of drastic color shifts. Get the right Lighting equipment that offer Minimal color shift or not color shift at all
2. White Balance Calibration: Ensure your camera's white balance settings are accurately configured for the chosen color temperature of your lighting during filming. This can reduce the extent of color correction needed in post-production.
3. Test Shots and Monitoring: Periodically review test shots during filming to monitor any potential color temperature changes. Making necessary adjustments in real-time can prevent significant shifts that would require extensive post-production correction.
4. Color Chart or Reference: Use a color chart or reference object in your scene while filming. This reference can serve as a guide during post-production color correction, making the process more efficient and accurate.
While post-production color correction might be necessary at times, taking proactive steps during filming to ensure consistent lighting and accurate white balance settings can significantly reduce the extent of color shifts, thereby minimizing the time spent on correction in post-production.
Regular Checks: Implement a schedule for inspecting and monitoring the lighting equipment, replacing components or adjusting settings as needed to maintain consistency.
Invest in Reliable Equipment: Choose lighting fixtures from reputable brands known for their reliability and consistency in color performance.
Managing color temperature and preventing shifts in lighting color over time involves a combination of proper maintenance, calibration, and investing in high-quality equipment. Regular checks and adjustments help maintain consistency, ensuring your videos have the desired visual impact.
When selecting lighting equipment, it's essential to balance your creative requirements with practical considerations such as budget, portability, and ease of use to enhance your videography work. Always test and experiment with lighting setups to achieve the desired visual impact for your videos.
What is the correct light intensity for a Video Production?
Firstly you have to understand the unit measurement of a light intensity
The unit measurement of light intensity is typically measured in terms of "lumens" or "lux."
Lumens: Lumens measure the total amount of visible light emitted by a light source in all directions. It indicates the brightness of the light source.
Lux: Lux measures the intensity of light falling on a surface or the amount of light per unit area. It quantifies the brightness experienced at a specific point from the light source.
In the context of filmmaking and photography, understanding these units helps in selecting appropriate lighting equipment based on the required intensity and brightness needed for a particular scene or setting. Lux is particularly important when considering how bright a light will be at a specific distance from the subject or area being illuminated.
The minimum lux needed for good video capturing can vary depending on several factors, including the camera's sensor sensitivity (ISO), the desired look of the video, the scene's lighting conditions, and the specific requirements of the production. However, there are some general guidelines:
For well-lit indoor scenes or studio setups, a minimum of around 100 to 200 lux is often considered adequate for capturing clear and detailed video footage. This level of illumination can provide decent image quality without excessive noise or graininess.
In low-light conditions or shooting situations where a more cinematic or moody look is desired, videographers might work with much lower light levels, often down to 10-50 lux. However, achieving good quality footage in such scenarios might require cameras with better low-light performance or the use of additional lighting equipment.
Keep in mind that certain cameras perform better in low-light conditions due to their sensor technology or higher ISO capabilities, allowing for acceptable video quality even at lower light levels.
It's essential to test your specific camera and lighting setup in various conditions to determine the minimum lux needed to achieve the desired video quality without compromising image clarity or introducing excessive noise. Additionally, using higher-quality lighting equipment or employing techniques like adjusting camera settings or adding supplementary lighting can help enhance video quality in lower light situations.
The Popular lighting Manufacturers BB&S (Brothers and Sons Productions):
BB&S is known for creating high-quality lighting solutions for film, television, and broadcast industries. They specialize in LED lighting fixtures designed for professional use. Their products often feature excellent color accuracy, adjustable color temperatures, and high output, catering to various production needs. BB&S lights are favored for their durability and reliability on professional sets.
Litepanels:
Litepanels is recognized for its pioneering work in LED lighting technology for film and video production. They offer a wide range of LED lighting fixtures suitable for different applications, including panels, fresnels, and soft lights. Litepanels' products are known for their energy efficiency, adjustable color temperatures, and their ability to produce soft, flicker-free light, making them popular choices among filmmakers, cinematographers, and videographers.
Aputure:
Aputure is a prominent brand known for producing versatile and innovative LED lighting solutions at relatively affordable prices. They offer a diverse range of LED lights, from portable on-camera lights to larger, studio-grade fixtures. Aputure lights often feature high color accuracy, adjustable color temperatures, and user-friendly controls. Their products are popular among independent filmmakers, content creators, and videographers due to their quality and affordability.
Rotolight:
Rotolight specializes in advanced LED lighting solutions for photography, cinematography, and broadcast industries. Their products often integrate innovative features like adjustable color temperatures, wireless control, and special effects modes. Rotolight's LED lights are favored for their versatility, providing a range of lighting options suitable for various shooting scenarios, from portrait photography to video production.
Visio Lighting:
Visio Lighting focuses on manufacturing LED lighting fixtures tailored for professional video and photography applications. Their product lineup includes LED panels, ring lights, and specialized lighting solutions. Visio Lighting emphasizes high-quality light output, color accuracy, and user-friendly designs in their products, catering to the needs of filmmakers, photographers, and content creators.
Godox:
Godox is a manufacturer known for its diverse range of lighting products, including LED lights, flash systems, and continuous lighting solutions. They offer a variety of LED panels and versatile lighting fixtures suitable for both photography and videography. Godox lights often feature adjustable brightness, color temperature control, and wireless capabilities, providing flexibility and convenience for different shooting environments.
Nanlite:
Nanlite specializes in professional LED lighting equipment for photography, cinematography, and content creation. Their product range includes LED panels, tubes, and fresnels designed for various lighting setups. Nanlite lights are recognized for their high color accuracy, adjustable color temperatures, and user-friendly features, making them suitable for a wide range of applications in the film and video production industry.
Each of these lighting manufacturers offers distinct features and products tailored to different needs within the filmmaking and videography industries, providing filmmakers and content creators with a range of options to suit their specific lighting requirements.
Types of lighting commonly used in filmmaking, photography, and video production. These lighting types serve different purposes and create varying effects. Some of the main types include:
1. Natural Light:
- Utilizes sunlight or ambient outdoor lighting.
- Can create a soft, flattering look depending on the time of day and weather conditions.
2. Artificial Light:
- Tungsten Lights: Traditional hot lights emitting a warm, amber-colored light. Commonly used in studio settings.
- Fluorescent Lights: Produce cooler tones and are often used for a softer, more even light source.
- LED Lights: Energy-efficient, adjustable color temperature, and versatile for various shooting scenarios.
3. Key Light:
- The primary light source that illuminates the main subject or scene.
- Sets the overall tone and mood of the shot.
4. Fill Light:
- Used to fill in shadows created by the key light, providing a softer, balanced illumination.
- Helps reduce harsh shadows without overpowering the key light.
5. Backlight/Rim Light:
- Placed behind the subject, creating a rim of light around the edges.
- Separates the subject from the background, adding depth and dimension to the shot.
6. Practical Lights:
- Lights that are visible within the scene itself, such as lamps, candles, or any source of light incorporated into the set design.
- Adds realism and ambiance to the scene.
7. Specialty Lights:
- Spotlights: Focused, intense lights used for highlighting specific areas or subjects.
- Floodlights: Wide, diffused lights covering larger areas evenly.
- Ring Lights: Circular-shaped lights often used for beauty shots, portraits, or close-ups due to their flattering and even illumination.
8. Modifiers:
- Softboxes: Diffuse and soften light, reducing harsh shadows.
- Reflectors: Redirect light to fill in shadows or enhance certain areas of the scene.
- Gels: Color filters used to alter the color temperature or create specific color effects.
Understanding these various types of lighting and their applications helps filmmakers and photographers achieve different looks and atmospheres in their visual productions, allowing for creative control and expression in storytelling.


Comments
Post a Comment